Dress up your door

Yarn Wreath Tutorial.

Crumb Cake

Who would've thought?

Coconut Sugar Scrub

A simple, yet luxurious gift. Don't forget to make one for yourself!

Showing posts with label tutorials. Show all posts

Tuesday, January 24, 2012

Yarn Wreath tutorial

Hello friends! I’ve been busy stocking up the shop, but thought I’d share with you a project I made before Christmas as a gift.  I know we’re past Christmas, but you could change this up for each season. So without further ado…here’s how to make a yarn wreath!
Supplies: foam wreath; yarn (amount will depend on the size of your wreath); floral picks; floral wire; ribbon and anything else you want to embellish your wreath.
Step 1: wrap the wreath with the yarn.  This part is the longest process; I wrapped two layers so that you couldn’t see the foam through the yarn.  After I finished my wreath, I was blog hopping and saw someone who had used quilting batting over the foam to give the wreath a more rounded appearance, so feel free if you want a “fuller” looking wreath.


Step 2: Take your floral wire and wrap it around the floral picks (these are the decorations you find at the craft store, leaves, mini ornaments, glittery bits, etc) so that you have a way to attach the decorations to the wreath. 


Step 3: Push the wire into the wreath to secure.  Continue adding all of your elements layering if need be.


Step 4: I then wrapped more yarn over top to secure it and cover the wire.  I suppose you could also use a dab of hot glue to secure things, but remember you’d just be securing it to the yarn, so make sure the yarn  is tight around the wreath.


Step 5: I used some felt and cut some flowers with my Nestibilities dies and Cuttlebug. I like how they are layered, but still lay flat.  For the next wreath I make {one for me to keep this time ;)} I think I’ll try making more dimensional felt flowers; here’s a tutorial from Scrapping Tonight


Step 6: Add a ribbon at the top to hang the wreath.  Ta –Da!


Here’s a few detail shots:


I love how this wreath turned out, such a welcoming decoration to hang on your front door and welcome guests to you home.  If you make one, be sure to come back and share pictures- or post them on the A Paper Buffet’s Facebook page .

Happy Tuesday!
Steph

Friday, October 22, 2010

Gobble Gobble: Colouring 60 Turkeys with Prismas and OMS

I used to avoid stamped images that required a lot of colouring.  Although my kindergarten skills were sharp and I could colour within the lines, I could never get the shading and smoothness I had seen on, (or what felt like), everyone else’s cards.    I certainly felt there was no way I could colour with Copic markers, even though the effect is incredible.

Through several blog hops and tutorial posts, I discovered the  problems: I wasn’t using Prisma pencils (artists pencil crayons) and I wasn’t using Odourless Mineral Spirits (Gamsol).

When used with a colouring stub, nib, or whatever they’re called, the OMS blends the colour producing shading and a very smooth appearance.

To start, I outline the image, that way I can pull the colour in and have more shading around the edges.  It’s also great because this step doesn’t have to be exact- which is good when you’re colouring 60 turkeys!


I know there’s not going to be enough colour just from the edges, so I lightly colour in the body and each feather.  As you can see, the colouring isn’t even from the pencil crayon.  I remember in grade school, we shaved the pencil crayon with the edge of a scissor, then used a tissue to make the colour even and blended.  The OMS does the same thing, but is much easier, and more precise then shaving the pencil crayon with a scissor edge.


Now the colour is evenly blended and I have some depth of colour. 


Makes a huge difference, doesn’t it!?

I did the same thing with the “Thankful”; outlining the edges, then pulled the colour in with OMS


While I’m still no where near anything that Jen or Donna colours, or will be graduating to Copic markers any time soon, this has helped tremendously!

Try it out!

Happy Friday,

Ciao for now,

Wednesday, December 30, 2009

Tutorial: How to make your own Lip Balm

Aside from paper, my other obsession is lip balm. I have one in every room, in each purse and in my car.

About 6 months ago, I ordered some organic beeswax lipbalm from an Etsy store. It soon became my favourite lipbalm and I carried that little pot where ever I went. A few weeks ago, I realized I would soon run out, and contacted the Etsy seller. Her storefront was empty and as I clicked the "send" button on my convo, I remembered she was doing her PhD and was probably not selling on Etsy anymore.

I waited for a reply, but came up with a Plan B just in case.

When a few weeks had passed, I decided Plan B needed to go into action. I became obsessed determined to make my own lipbalm. I had the list of ingredients, it was just a matter of putting them all together.

So to save you from your own "I'm running out of lip balm" emergency, here is how you make beeswax lip balm.

This recipe is from the Methods of Healing website for organic lip balm. I was surprised how easy it was to find all the materials in town.


Ingredients:
Organic Beeswax
Organic Honey
Organic Scented oil (I used peppermint because it's my favourite)
Castor Oil (you could use organic, but I could only find it in a 3 Litre bottle, which was too big, so I used the castor oil from the pharmacy).


Equipment:
medicine droppers (if you're putting the lip balm into tubes),
glass mason jar or glass measuring cup (a makeshift double boiler),
whisk and
your lip balm containers.


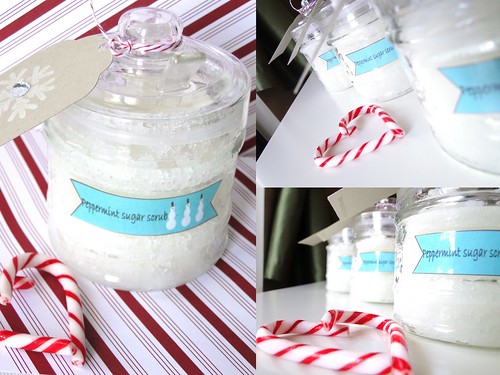
I found these containers at an Apothocary in town; you can find them online if you can't find them where you are. I also had 3 empty tubes from lip balm that I had finished. Wash them in hot soapy water, rinse and dry thoroughly.

Recipe:
1 tbsp beeswax
2 tbsp castor oil
1 tsp honey
few drops scented oil (do not use extracts, those are made for cooking)


Step 1:

Prep the beeswax. I could only find organic beeswax in a block, so I grated mine with a cheese grater that will now only be used for beeswax. You can also find beeswax in pellet form, which will eliminate this step.

be careful! we were having spaghetti that night for dinner, and shredded beeswax looks hilariously similar to shredded cheese ;)

Step 2:

Set up your double boiler system. Fill a small saucepan or pot with water and heat. Place your mason jar or glass measuring cup in the water. Add 1 tbsp shredded beeswax and melt.


Step 3:

Add the Castor oil and honey to the melted beeswax. There's a temperature difference so I found some of the beeswax came back to solid form. Keep whisking and heat until melted again and smooth.

Step 4:

When all ingredients are smooth, remove the jar from the heat. Let cool 30 seconds and add your scented oil. Whisk again to ensure the oil is mixed in.

Step 5:

Working quickly, fill your containers. Use the medicine dropper to fill lip balm tubes; I was able to pour the liquid right into the pots with the mason jar.


Step 6:

Cool in the fridge for about 10 minutes or less; you can leave this at room temperature to set, but it might take a little bit longer.

Step 7:

Enjoy your new lip balm!

There are many variations of this recipe, and you can add other scented oils and Vitamin E. The Castor oil provides shine, which is why I chose this recipe. I have purchased other homemade lip balms with other oils and found the balm to be really gritty. This balm is very smooth and keeps your lips soft. It will not protect from sun damage, although I have read online that you can obtain SPF factor and add it.

I found this recipe to be nice and soft, perfect for the lip tubes. I might add a pinch more beeswax when I make it again for the pots to make it a little bit thicker. You can alter the amount of oil and solid (beeswax) until you find a consistency you like.

I now have a hunk of beeswax, so you might find some more tutorials until I use it up ;) Either way...I now have a lifetime supply of lip balm materials.

Ciao for now,

Friday, December 11, 2009

“Life is like a box of chocolates…”

A little box of Special Edition Ghirardelli Peppermint chocolates to be exact.


These are for the ladies at The Chop Shoppe and they were super easy to make, I have tons of ideas for these little guys now.


Each box can hold up to four little chocolates.  I picked red and white to go with the peppermint chocolate. 

I used SU RR cardstock and ribbon and the DP is American Craft Christmas paper from last year.

You can find the tutorial HERE on SCS, give it a try and come back and show me some pictures!

Got a very busy weekend ahead with 2 Christmas parties, finishing Ethan’s birthday invites, working on some more BIG stuff to share with you soon and maybe, maybe work on my own Christmas cards ;)

Happy Friday!

Ciao for now,

Monday, December 7, 2009

Gaga for Gift Card Holders

I love gift cards, but hate the paper envelope they give you at the store.  I always feel like I still need to give a gift with the gift card because the envelope is always so blah!

Last year I used a different template and made my sister a bunch of gift card holders for her then-employees for the holidays. 


Forgive the terrible picture, this was about a year ago when I was still fumbling through picture-taking.

I really like the template, (it’s from the Wild Stamping Sprinkles blog) but they’re somewhat time consuming with the measuring of the band and I was looking to make a whack of them to sell at A Paper Buffet, the hair salon and at the Craft sale.

So I looked around and found THIS template, from Stamping with Roxy which seemed to be very easy to mass produce, and with the help of my beloved Score-Pal (I really don’t know why it took me so long to get one, it’s a lifesaver) I was in the gift card holder makin’ mood!

This is my FAVOURITE BO Bunny paper EVAR! so I distressed it with chocolate chip in and created a Real Red mat.


I really just can’t get enough of this paper, but I did make some other designs.


These are some of the ones that went to the hair salon The Chop Shoppe to be sold.


giftcards2

So cute and simple!


These are the coffee themed ones; the stamp is from There She Goes. It was fate that I found them on Jen’s {i heart 2 stamp} blog weeks back, I was about to have to draw these coffee cups myself!


These are the gift cards I use in my Latte Love gift sets at A Paper Buffet.

(told you I love that Bo Bunny Paper!)


Ok, I’m sure you are gift-card holder-ed out, so that’s it for me!


Happy Monday!


Ciao for now,

Monday, September 28, 2009

Video Tutorial: Wire Ribbon Bow

Ok, be nice- here’s my first video tutorial.

This came to be after I shared my Explosion box and there were some questions about how to tie the bow.

I use these bows for my Christmas wreaths and tree; Christmas presents; birthday presents and even made them for my friend’s wedding.

I learned how to make these bows while I was working in a Flower Shop when I was in University.

Here we go!

Here's a picture of the blue bow on a small jewellery box; the bow is a bit large for this box, but it's just an example.


First I tied the ribbon around the box and made a small knot, so that I have something to wrap the wire from my bow around:


Then I attached the bow by tying the wire ribbon around my knot.


Here's an orange bow on the same box, just taped on; again it's a bit too big but it was the only box I could find...it's just to give you an idea.


Try it and let me know how it goes! Feel free to email any questions to me: apaperbuffet@rogers.com


As I said, the hardest part is learning to hold the ribbon in your hand.

Still can't get it? Don't worry, I'll be adding some bows to my Etsy store over the next few weeks. They will be reasonably priced, will ship flat ('cuz you can fluff 'em when you get them) and will be incredible for your holiday gifts; you'll be able to impress all your family and friends...I won't tell if you don't.

As the hostess with the mostest would say, "it's a good thing" ;)

Happy Monday!

Ciao for now,

Tuesday, June 9, 2009

Tutorial- Envelopes for oversize cards

After I posted my progress on my custom order yesterday (see previous post), Tonya asked how I was going to make the envelopes, so I thought I’d share.

I made these ones differently than my 3x3 envies, but you could use that method and just increase the size.

The cards when finished were 8”x8”;  I used MS paper which is 18”x18”.  Because I can’t cut a straight line to save my life, and my paper cutter can only accommodate up to 14” paper, I folded the 18”x18” paper in half and then cut my 8”x8” card. 

Which means I had a 9”x9” piece left, for each card.  Capish?

Forgive me with the pictures,  I started snapping pics when I had already finished one step.

1) Cut away 1/4 to 1/2 inch from each side on ONE side of the paper.  This part will become the back of the envelope; you’re doing this so the tabs that you make on the front of the envelope are on the inside the envelope looks seamless. 

In my picture (you’re looking at the inside of the envie), the top half above the fold is the front of the envie, below the fold is the back.  The paper below the fold is now 8.5” wide and the part above the fold is still the original 9” wide.

DSC08156

2) I fold up the bottom part, and use my bone folder to score along the edges so the tabs will fold nicely and inline with my bottom piece. 


3) Because this paper was 9x9 to start with, I used the burgundy card stock from the card to make the flap of the envelope.  If you have a long enough piece of paper for your envelope, just score another fold 3” from the top to make the flap. 

Still with me?

4) Fold the side tabs over, but DO NOT GLUE to the front of the envelope.  These will be glued to the back of the envelope only, so it can expand when you put the card in.  Yes, I’ve learned the hard way.

5) Fold the bottom to the top and glue to the tabs.

If you want the envelope to tie with a ribbon, follow the next steps.  The other option is to use an Xacto knife and cut a small slit to tuck the flap in to seal the envelope.

6) Use your Big Bite orDSC08158 Cropodile and punch a hole in the BACK of the envelope.  I like doing this part when the envelope is all together because you can judge where the hole should be.

You want the hole below were the flap is going to be so that the ribbon will tie flat, but not too far down that it will be hard to thread the ribbon through the INSIDE.

DSC08159 7) Insert Eyelet


DSC08161

8) Thread ribbon through the inside and glue to the flap; I used ribbon glue here, it’s still wet, but it will dry clear.  Tombo runner adhesive also does well for this.


DSC08162

9) Tie ribbon to close flap and ‘seal’ envelope.


DSC08163Add label to the front of the envelope (and decorate if you want) and voila!  Handmade envies for oversize cards.

I think you can use this method for any size, just make sure you have 3-4” for the flap, and use paper at least 1/2” – 1” wider than your card.

If all of this is clear as mud, email me at “apaperbuffet@rogers.com” and I can explain it again:)

I’m going to a concert tonight in Toronto and will be back tomorrow, and I promise! I will be playing in the Twilighttuesday.com challenge, I have a million cards to make for all the summer birthdays, etc.

Happy Tuesday,

Ciao for now,

Twitter Delicious Facebook Digg Stumbleupon Favorites More
This Is A Do-Follow Blog