Dress up your door

Yarn Wreath Tutorial.

Crumb Cake

Who would've thought?

Coconut Sugar Scrub

A simple, yet luxurious gift. Don't forget to make one for yourself!

Showing posts with label cards. Show all posts

Monday, February 18, 2013

Clean lines, bright colours

Happy Family Day!  Here in Ontario it’s our first long weekend of the year, Family Day. I’m grateful for an extra day to get things done…sometimes the weekends are just not enough time to get everything done.

Last year I made some cards and invitations for a bakery in a small town outside of London.  I kept the design simple, but I loved the impact the white space and the bright colours had.

I love this turqoise and pink card, the little scalloped edge, the patterns on the presents…love it!


I made another card to coordinate with the pink and turquoise and this time, I used the balloon stamp from the set.


I don’t often use bright colours, I tend to stick to the earthy colours, but I love how these looks and need to remember to branch out from my routine.


Both cards are available in the A Paper Buffet shop and I’ve got more to list and share with you.


Happy Monday!


Tuesday, June 12, 2012

MojoMonday 245: Graduation card


It’s been quite a while since I played along with Mojo Monday, but when I saw the sketch, I knew it was perfect for a graduation card a friend had asked me to make. 


The graduation cap stamp I have is small, so sometimes I can be hard to incorporate a smaller image as the main focal point.  MojoMonday 245 had two small circles that I knew would be perfect!


I grabbed some Bo Bunny Sweet tooth paper; it’s so bright and cheerful and girly- just what my friend wanted.


Card Recipe:

Base- SU Crumb Cake

Matting and Ink- SU Pool Party

DP- Bo Bunny Sweet Tooth

Baker’s twine- SU Pool Party

Ribbon and stamps- from my stash


The card came together quite quickly- don’t you love when that happens?  I think it’s mostly due to the paper, sometimes it all just ‘clicks’.


Happy Tuesday!

Wednesday, February 15, 2012

Hello!

How are you? It’s been a little while, I know.  Things have been quite busy here.  I had a great weekend at the Artist’s Affair Valentine Show and I’ve been working hard to restock the A Paper Buffet Etsy shop .  I have some great new ideas for 2012, but I don’t seem to have enough time to implement them all.  Don’t you hate when that happens? I’m trying to write them all down so that I can work through them one by one.  While holiday cards (Christmas, Valentine’s, etc) are very busy times for me, I also want to create some cards to keep on hand, that you can use for any reason…or for no reason at all!

I made a few of these cards for the Artist’s Affair show and got some really great feedback (and sold out!)  I’ve expanded the line and added a new option in the shop.  I’m going to call this the “hello” line, for lack of a better title.

Each card is made with a kraft base, with a stamped animal inked in a colour to match the card stock matting.  I love the white space on the card- which is usually a bad thing!

Lion


Owl


Fox


Turtle


Whale


I can’t decide which is my favourite, so I’ve decided you shouldn’t have to either.  I’ve offered a “choose 3” option in the shop (along with a slight discount for buying the set) so you’ll never be caught without a card!


So, tell me if you had to choose, which one is your favourite?


Tuesday, November 15, 2011

Vintage card- part 4

Here’s another card made with some vintage Authentique paper.  I used the striped paper as the background and kept the rest of the card quite simple.


I used Old Olive as the card base and added a cherry cobbler mat.  I cut a poinsettia with my Slice machine from cherry cobbler paper; the poinsettia is cut in two layers and I really like the effect.  I used a large rhinestone in the centre of the poinsettia to add a touch of sparkle.


I stamped the Christmas tree in old olive ink; this tree is one of my favourite Christmas images and is from the Season of Joy set.  I cut out the Very Vanilla paper with my nestibilities, but before I removed it from the die, I sponged some Crumb Cake ink around the inside.  I’ve often seen this technique and was quite envious.  I’ve only recently gotten better at it, the trick is not to have too much ink on your sponge.


I used a scallop punch for the bottom edge of the DP, and placed a rhinestone in a pattern on the bottom. Finally, I added my absolutely favourite ribbon…which technically isn’t ribbon at all- it’s called seam binding in Cherry cobbler.

The inside of the card used come more Authentique paper (I seriously can’t get enough of it!), more scalloped border punch and distressed all of the edges.


I’m also really pleased how this card photographed. Some cards are very easy to photograph and some are…well an absolute nightmare.  I am getting better, but sometimes it’s still a struggle.


Happy Tuesday!

Thursday, November 10, 2011

Vintage Christmas- part 3

This might be one of my favourite cards so far; and it came about by accident!  I had cut the background paper, punched the red edge and attached the red ribbon and then…hit the creative wall.  The card I had planned out, just wasn’t working anymore.  I tried a number of different images, sentiments, but nothing was working.  I put the card away for a night and decided to come back to it later.

I looked over my craft table and saw a scrap of the Authentique Christmas paper tucked under my paper cutter.  This little group of birds was staring back at me…eureka!  It was perfect! The answer to saving the card wasn’t a stamp at all…it was patterned paper!

I cut out the birds with my oval nestibilities, and added a cherry cobbler mat oval and it became the focus point of the front of the card. 

The inside of the card used coordinated paper, with a lace punched old olive paper. 

This card is a bit vintage, and for some reason I feel the bird image makes it a bit country/shabby chic.  For a card that didn’t come together as I had envisioned, I’m thrilled with how it turned out.  Some times you just have to let the creative process completely take over.


  I’ve added this card to the A Paper Buffet Etsy shop .  I’ll have more cards to share with you from this paper collection soon!


Happy Thursday!


Wednesday, November 9, 2011

Vintage Christmas- part 2

Here’s another card with no stamping on the outside.  Another vintage Christmas cards using Authentique Christmas “Wonder” paper.  I just love this snowman!

I added a different stitch (and did it by hand…I must be crazy!) to the border to add some texture.  I used the cherry cobbler for the base, with a black mat and black stitching.

There’s not much more I can say about this card- I think it speaks for itself.  The collage paper is absolutely gorgeous, I can’t wait to show you more from this line.

I added more to the inside of the card again, using more patterned paper and distressing all of the edges.

  I’ve listed this card in the A Paper Buffet Etsy shop and I have some more vintage themed cards to show you, so stay tuned!

Happy Wednesday!


Tuesday, November 8, 2011

Vintage Christmas; part 1

Surprisingly, there’s no stamping on the outside of these cards.  I recently bought some gorgeous Christmas paper (Wonder by Authentique) and I just couldn’t bare to cover it up with stamped images. 

This paper has a very vintage theme, which isn’t something I normally work with, but I couldn’t resist this paper.  I added hand stitching to the border of the card to add some interest since I was using the paper as the main image.  I was most happy about using black and red, what an impact it has!


I just love this old vintage Santa image, and the postmark just adds to it.  I decided to dress up the inside of the card since the outside didn’t have anything extra


I added some more of the Authentique paper, and a border of green cardstock, punched with a lace punch.


The card base is cherry cobbler and I used some black paper for the matting.  The inside panel is more black with a

very vanilla panel. 


I’ve listed this in the A Paper Buffet Etsy shop  and I’ll be back tomorrow with another vintage Christmas card.


Happy Tuesday!


Thursday, November 3, 2011

Thank you card

I bought some mini shipping tags months ago, and completely forgot about them.  I needed to make a thank you card, and thought the mini tag would be the perfect way to stamp the sentiment.  I used some of that great Simple Stories Elementary paper that I used for these birthday cards and a simple layout.  I just love this paper, and the slightly distressed look;  I distressed the tag using some SU Crumb Cake ink to compliment the DP.


The card base is SU Very Vanilla, and I layered Cherry Cobbler paper for the matting.  I love the deep colour of the Cherry Cobbler paper.  I added some Cherry Cobbler seam binding ribbon to the tag to tie it all together.  I made the card 5” square- I needed the card for work and 10 people had to sign it, so I wanted to make sure there was enough room.


Happy Thursday!

Monday, October 24, 2011

Birthday greetings (and a penguin sweater)

My  mom requested some (masculine) birthday cards for some upcoming family birthdays, and luckily I had just bought some gorgeous paper.  I had picked up some Simple Stories Elementary paper (Spelling Bee #1207 and Smarty Pants #1205) for a thank you card, but had enough for some birthday cards.

I chose a variation of  Mojo Monday sketch and made two cards using this great paper.  Both cards were made on Night of Navy cardstock, with Old Olive card stock as mats.  Each edge was distressed with Crumb Cake ink.


I bought the little shipping tags last spring, and completely forgot about them.  But it worked really well on this sketch. 

The second card used the same paper, but flipped some of the paper (thank goodness for double sided paper), and this time I used a label and a button instead of a tag.


You probably thought the bit about ‘penguin sweaters’ in my title was a joke, but, sadly, it’s not.     There was an oil spill off the coast of New Zealand and it has affected some Little Blue Penguins.  A yarn store, Skeins, a yarn store in New Zealand is collecting Penguin PJs to be forwarded on to help the penguins.  The penguin sweaters will prevent the penguins from preening their oily feathers and ingest the oil.

The pattern was posted on the  Skeins newsletter.  There was an update on the blog and the Wildlife centre doesn’t need any more sweaters, but you can still send them in as there is another rescue centre that has asked for the surplus. 

I’ve started a sweater and I’ll send it down once it’s finished, here’s a snapshot (from my mobile, sorry for the bad lighting) of the first part.

penguin sweater

I’ll have some more projects to share with you this week, and some new holiday items to add to the store- make sure you check out the A Paper Buffet’s Facebook page and grab a coupon to save 10% on any purchase until Oct 31st (limit one per customer). 

Happy Monday!

Saturday, October 1, 2011

Happy World Card Making Day!

I’ve been saving this card to share with you, and today, as World Card Making day, is perfect timing.  A cousin of my dad’s is getting remarried this weekend, and they are honeymooning in Hawaii.  My mom asked for a wedding card for them with a Hawaiian theme, and since the wedding was going to be casual, not too fussy.  I was completely stumped!  I searched the net for inspiration and found it after some hunting, sourcing the right paper and a few paper cuts.  Here’s a hint…origami!


Isn’t this THE cutest card!!


I folded some patterned paper into Hawaiian shirts!!

I started with the Groom’s shirt.  I took a few practice sheets (I used computer paper to practice to get the folds right, it’s about 20lb weight paper).  Then I had to find a patterned paper that 1) looked Hawaiian and 2) wasn’t too thick that I couldn’t fold it.


I think it’ll take some more practice to get pattern placement, but I’m thrilled with how it turned out.  I cut a bow tie from some teal paper, and the colours of the card base were worked around the grooms shirt.


For the bride I wanted something a bit more bride-ish.  I found some ivory patterned paper that was just the right thickness and folded a second Hawaiian shirt.  I added a string of adhesive pearls.  I found some netting in a craft box, that was probably the wrapping of a wedding favour and created a tiny veil.


I wanted the shirts to be the main focus of the card, so I kept the rest of the card quite simple.

I see so much potential for the Hawaiian shirt- the perfect thing for Father’s day or birthday cards for Dad.  You will be seeing more of the Hawaiian shirt!


I’ll be enjoying a football game and a weekend with friends as it’s my University Homecoming, so I won’t be making any cards today- but YOU can!  Get crafty!


Happy World Card Making Day!!

Friday, September 9, 2011

to a great pair

I love punny stamps, and one of my favourites is from Stampendous, that features little images and cute sentiments.  My mom ordered an anniversary card, and I knew I had to use this set.  I picked my current fav colour combo of grey and lime green and set to work!


Isn’t it fun! Who wouldn’t love to receive this on their anniversary! The card base is SU Basic Grey, and I’ve layered some Whisper White.  DP is from my stash and I used it on the birthday cards (see previous post), also ordered by mom.  The ribbon is Old Olive satin ribbon and I was surprised how well it worked with the lime green.


I stamped the pear in grey ink, and added another beside it (I really need to get one of those mirroring stamps…) and then came my favourite part- watercolouring.

I used Pear Pizzaz (because it’d be weird if I didn’t), Old Olive and just a hint of Yo Yo Yellow to lighten it up a bit.

Some green rhinestones below the sentiment pulled it altogether.  I used some of the same DP on the inside, but forgot to take a picture.

Such a simple design, but this one still packs a punch because of that bright green.


Happy Friday friends!

Thursday, September 8, 2011

Birthday cards in 3,2,1…

My mom called with an order for three birthday cards, feminine, to be hand delivered.  She’s a pro now in telling me the information I need to know right away ;)   She also requested an anniversary card, but I’ll share that with you tomorrow.
Here are the birthday cards I made for her, again using sketches from my Paper Crafts Sketch magazine.
 
The first card is soft and very “flowy”.  I found a set of flowers I had made when I first got this nestibilities flower die, and thought it was perfect for the sketch.  I stamped the flourish in SU Sage Shadow on some Very Vanilla card stock.   I placed the flower in the centre of the flourish, then added some adhesive pearls.


I love the layers of the flower. I’ve also discovered that spritzing the paper with a fine mist of water helps the paper curl into more realistic flower petals- try it yourself!  The sentiment was also stamped in Sage Shadow, and the card base is Crumb cake.  I kept the inside blank, and matted some more VV cardstock with the SS.


The second and third card uses some brighter papers, but still keeps them feminine.
I typically avoid panels (I hate cutting them) and my nestibilities rectangles just weren’t the right size for what I wanted to do.  But I was hooked on this sketch and really wanted to make it work.  The card base is Night of Navy, and I found some floral DP in my stash.  I distressed the edges of the DP and spritzed it with water to help curl the edge. 

A mat of Basic Grey is the backdrop to the panels, and the flower stems are stamped in matching grey ink.  
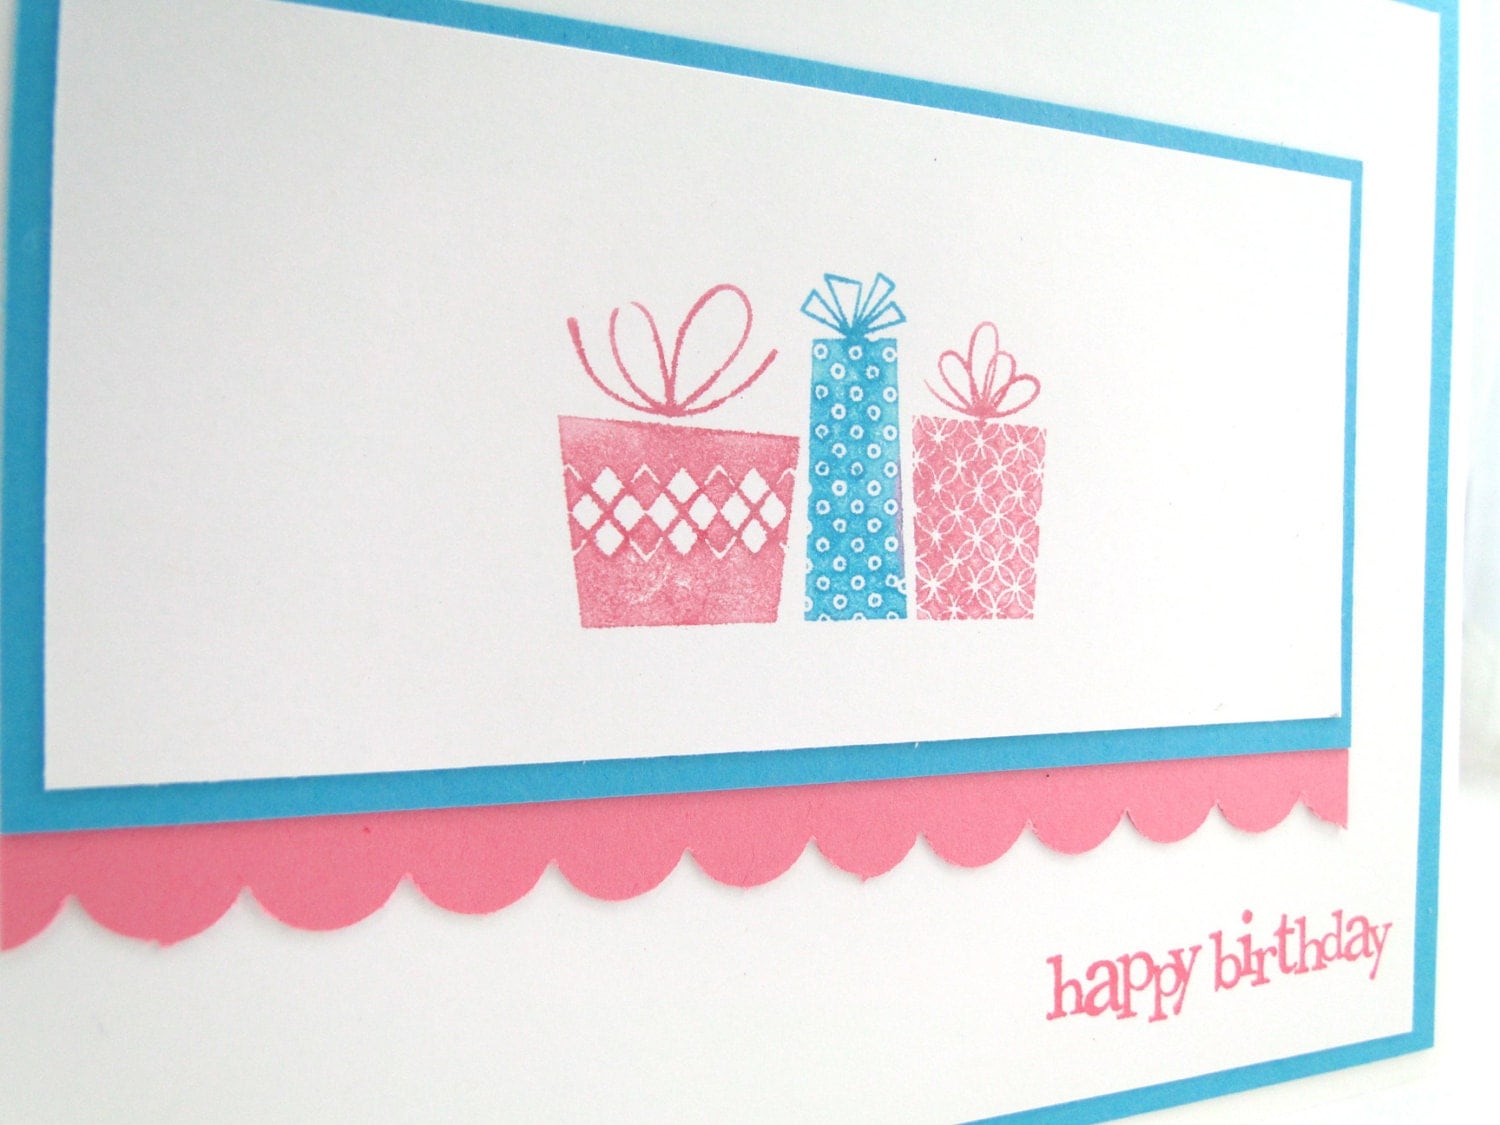
The present (from Birthday Whimsy, as is the sentiment) was stamped in Brocade blue- a blue with lovely grey tones.  I used some coordinating DP to make the flowers with the small nesitibility die and used a silver brad to keep them in place.   I love the symmetry of this card!


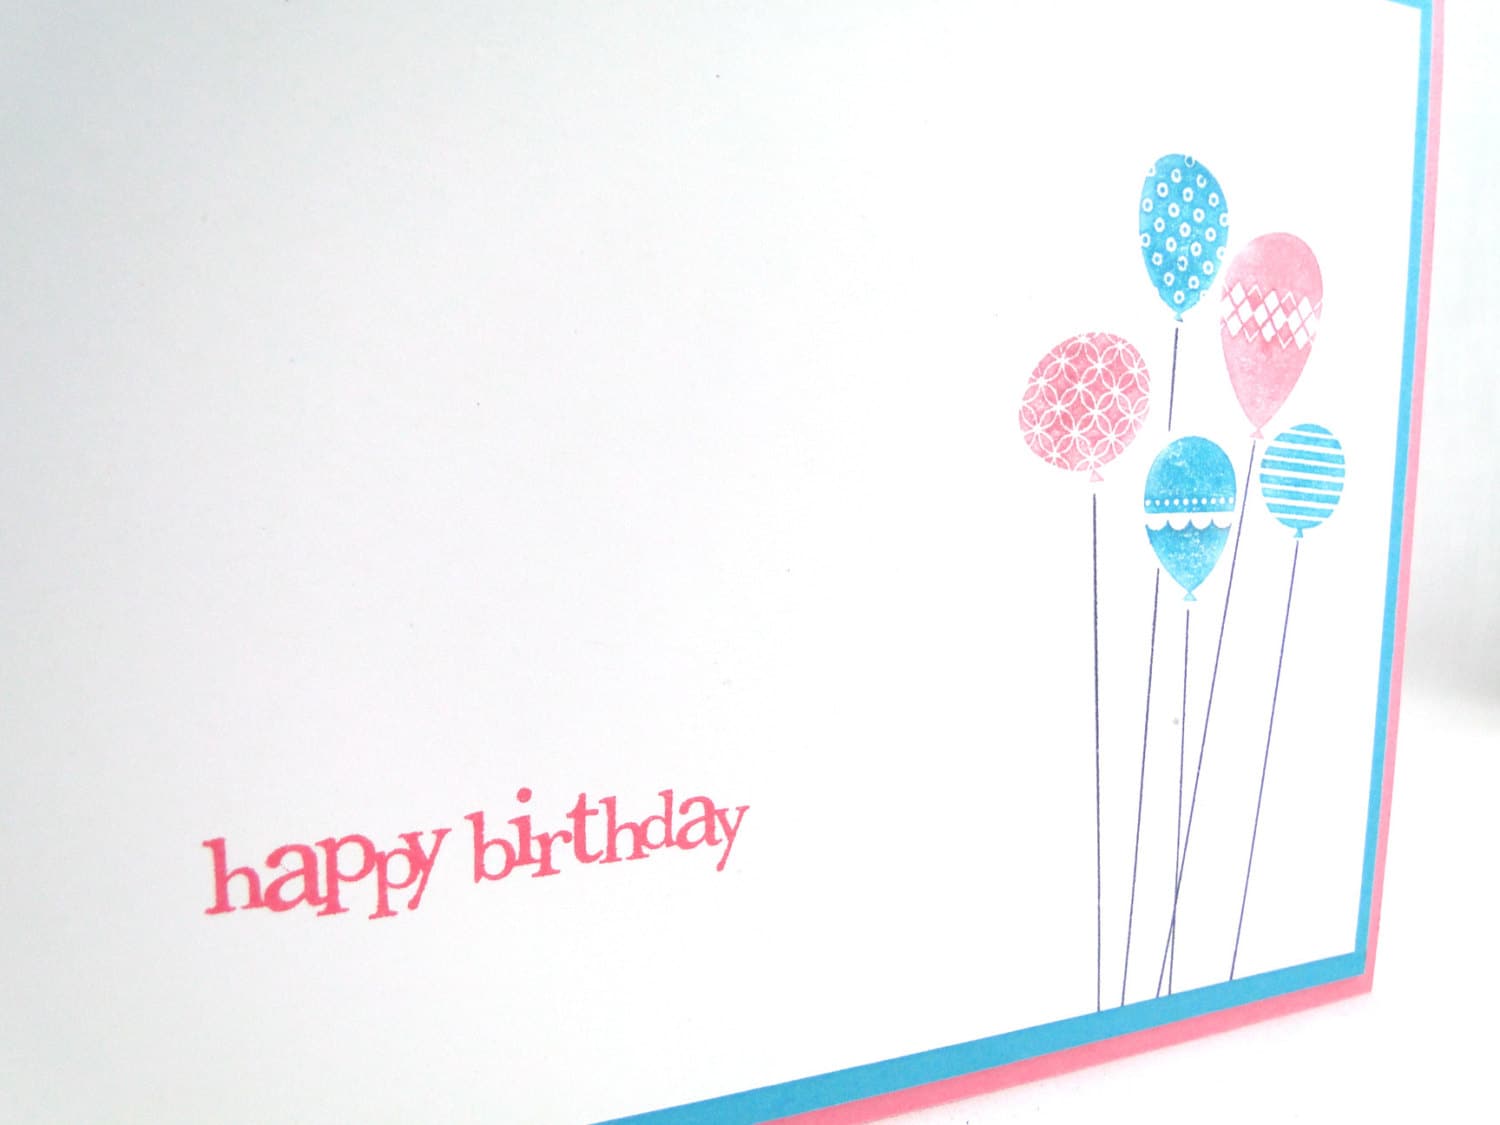
The third card has a vertical layout, and was designed as a pocket card (you’ll be seeing a pocket card soon), but I modified it for a traditional card.  This layout really highlights double sided paper, and I found some prima flowers that were the right shade to match.  I’m really loving the lime green, grey and blue; it’s a colour combo I need to remember.  I layered the labels and added some grey grosgrain ribbon.  The inside has a  sweet birthday message.


Check back tomorrow to see the anniversary card I made, it uses one of my favourite Stampendous stamps!

Happy Thursday!

Wednesday, September 7, 2011

To Have and to Hold

Here’s another wedding card I made for a friend. 

The colours of the wedding are chocolate and teal, so I kept those colours in the card.  I love the simplicity of this card. 


I used SU Very Vanilla for the base, and some more BoBunny double-sided dp (it’s actually Valentine paper, with red and pink on the other side!), and some pool satin ribbon I picked up last year in Chicago.  The ribbon is thin, so I added a second layer.  I made the label with my Nesties and stamped the main image of the To Have and To Hold SU set in chocolate chip ink. I coloured the bride’s flowers and the groom’s bowtie with one of my MS markers, but realized it was too teal.  A quick swipe of my white gel pen muted the colour to match the ribbon perfectly!  I highlight the lines with a grey marker; it’s such a simple thing, but it really makes a difference!


I left the inside blank, but I did stamp the two hearts on the inside.  You can see here how I popped up the main image with some foam tape.


I used the sketch from my new Paper Crafts “Card Ideas for Paper Crafters” magazine.  Typically I use sketches from my favourite blogs/websites, but this mag had so many incredible sketches that I just had to pick it up!  I’ve made a few cards already and I’ll be sharing them with you over the next little while.  Sketches are a great way to jump-start your creativity.  Sometimes I can envision the paper and the stamp set just from looking at the sketch.


Happy Wednesday!


Wednesday, August 31, 2011

Wedded Bliss

My friend asked for some wedding cards for three upcoming weddings she has this fall.  She requested two of them be made in teal and chocolate brown, as those are the colours for two of the weddings {popular colour scheme}.  I got back to my roots and created an elegant, multiple layered card.  It was nice to go back to this design.  I did use a sketch, but I’ve been looking at so many, I can’t remember which one I used, sorry!

I used SU Early Espresso for the card base, and layered Crumb Cake and the patterned paper.  The brown heart pattern is Bo-Bunny, one of my favourites.  The teal is some two sided dp I found in my scrap and was the perfect size.  I stamped the image, SU To have and To hold, on Very Vanilla cardstock cut out with one of my nestibilities. 

I added a small pearl to the bride’s veil to match the pearls on the bottom of the main panel and inked the edges of the cardstock with Crumb Cake ink.  A small bow made from Early Espresso ribbon added to the left corner finishes off the card.

If you make your own cards, make sure you come back tomorrow for something that I think you will love!

Happy Wednesday!

Tuesday, August 30, 2011

One for the Mr. and Mrs.

This might be my favourite “word card” I’ve created so far.  I had to make the letters a little smaller in order to fit on a standard A2 card, but I’m really happy with how it turned out.

I just love this card!  I was tempted to leave in just the black and white, but when I remembered I had some glitter cardstock I couldn’t resist adding the hearts. 

I used Whisper White as the card base, and layered black cardstock.  I used my MM Slice machine to cut out the letters and punched the hearts with my MS heart punch.

There’s not much else to say about this card because the layout is simple, but it is time consuming with cutting out each letter and punctuation points.

This card is available in the A Paper Buffet Etsy shop and would be perfect for an upcoming wedding, or even an anniversary.

Come back tomorrow for another, more traditional wedding card.

Happy Tuesday!

Twitter Delicious Facebook Digg Stumbleupon Favorites More
This Is A Do-Follow Blog